
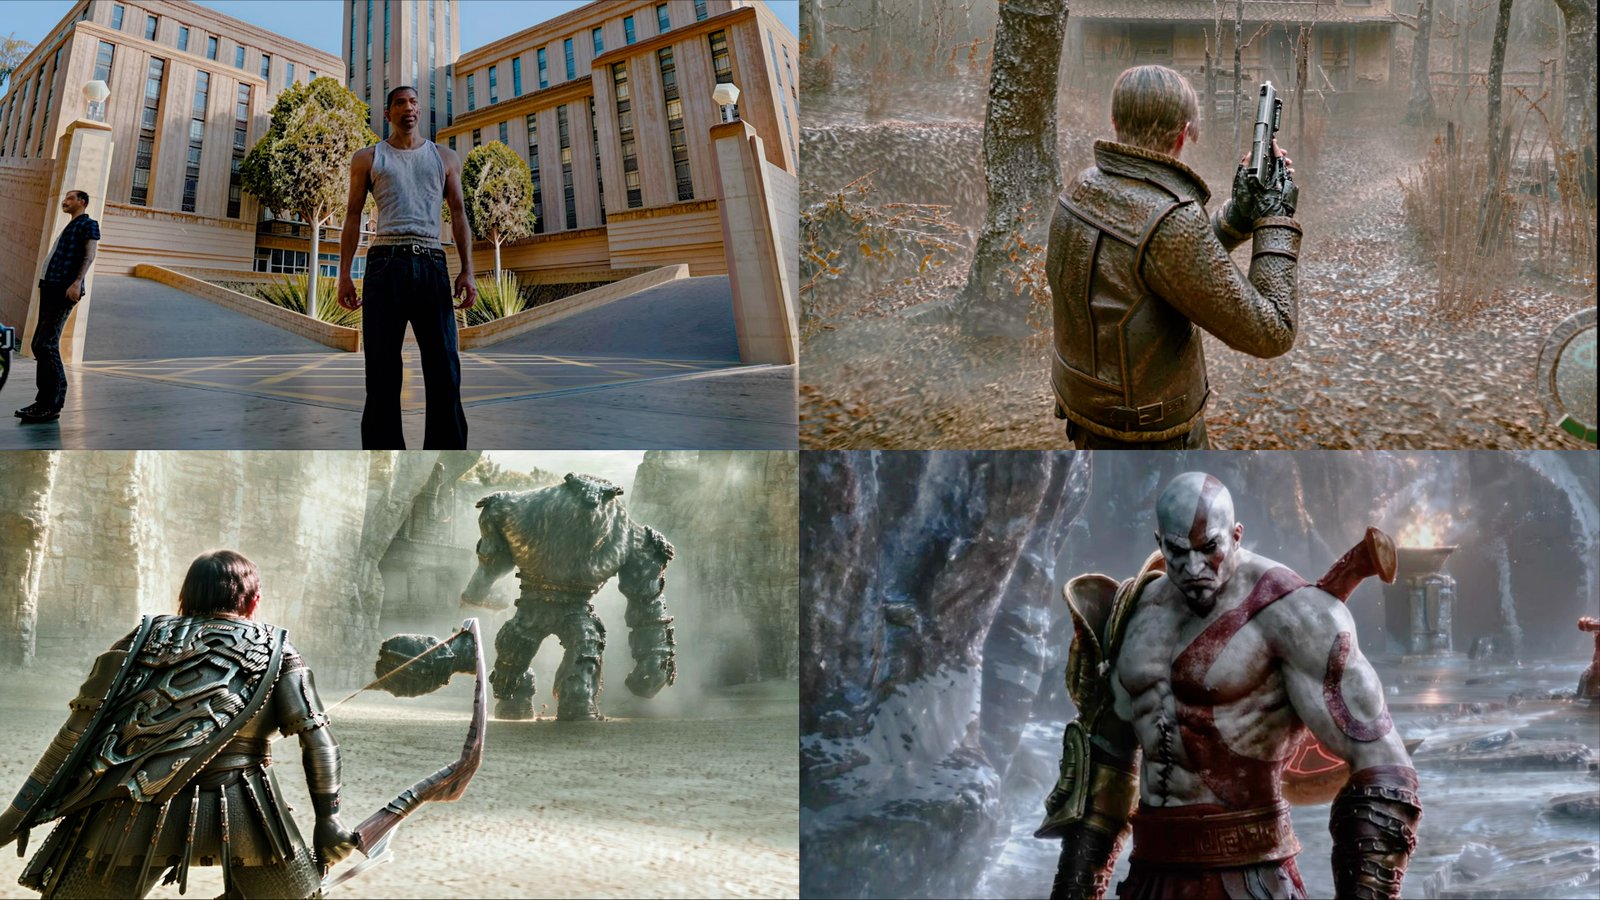
It is possible to apply DLSS 5 Neural Rendering several consecutive times on the same frame using a combination of DLSS5-Feeder with Deep Fried Chicken. In this method, the Feeder creates the DLSS contract that the game normally lacks, while Deep Fried Chicken acts as the neural consumer responsible for image processing.
In practice, this allows you to experience Neural Rendering in games that do not have native DLSS and also in some emulators compatible with the ReShade chain. After installation, Deep Fried Chicken itself allows you to increase the number of Neural Passes, making it possible to compare different amounts of passes over the same frame.
Compatibility is not universal. Operation depends on the graphics API, the game architecture, the way the title presents frames, and potential incompatibilities with other components. Therefore, results may vary significantly from one game to another.
https://youtu.be/0RAhJkAZq74What is DLSS5-Feeder?
The DLSS5-Feeder it is a ReShade add-on developed for games that do not have built-in DLSS. Instead of performing neural processing directly, it artificially creates a DLSS request, providing the neural consumer with the necessary information to process the frame.
The project uses information such as image, depth, and motion vectors to assemble this stream. The result is delivered to the separately installed neural consumer.
What is Deep Fried Chicken?
The Deep Fried Chicken, also known as DFC, is the Neural Rendering add-on that performs neural processing in this method.
DLSS5-Feeder and Deep Fried Chicken have different functions: the Feeder creates the DLSS stream that the game does not offer, while DFC uses this stream to execute Neural Rendering.
The DLSS5-Feeder project currently recommends Deep Fried Chicken as the neural consumer and states that it is necessary to use version 1.4.8 or higher DFC files are distributed by the author via Discord, rather than directly through GitHub Assets.
Which games are compatible?
DLSS5-Feeder supports different graphics APIs, including DirectX 10, DirectX 11, DirectX 12, Vulkan and OpenGL. 32-bit or 64-bit games can also be used, with some installation differences.
In certain cases, older APIs use additional components, and compatibility may depend on how the game works internally. Therefore, the fact that a title uses a supported API does not guarantee that the method will work perfectly on it.
The project itself maintains a list of issues and specific incompatibility cases, so it is worth checking the latest information if a particular game does not work.
Which graphics cards are compatible?
The method depends on NVIDIA DLSS Neural Rendering and therefore requires a GeForce RTX GPU compatible with the runtime used by the system.
Performance varies depending on the graphics card, the resolution, and especially the number of passes configured in Deep Fried Chicken. Increasing the number of Neural Passes can significantly increase GPU utilization and drastically reduce FPS.
How to download the updated DLSS5-Feeder
DLSS5-Feeder is distributed via the project's official GitHub. The version used in this tutorial is 1.16.0-beta.2.
To track future versions and get the latest files, use the project's official releases page:
DOWNLOAD UPDATED DLSS 5 FEEDER
On the release page, locate the file Install-DLSS5Feeder.ps1 indicated in the description. Unlike the main ZIP, this script is made available directly in the project's code and therefore does not appear in the Assets list.
How to download the updated Deep Fried Chicken
Deep Fried Chicken does not have a traditional public download on GitHub. The files are made available by the author through the official Discord server.
Use the link below to access the server and locate the latest available version of DFC. For this method, the DLSS5-Feeder project recommends using the version 1.4.8 or higher.
DOWNLOAD UPDATED DEEP FRIED CHICKEN
When downloading DFC, you must have the files deep-fried-chicken.addon64, deep-fried-chicken-nvngx.dll and deep-fried-chicken.cfg. The project itself recommends keeping exactly one neural consumer installed at a time.
How to install DLSS5-Feeder
After downloading the Install-DLSS5Feeder.ps1, place the file in the same folder as the game executable or emulator that will be used.
Open the program folder, right-click on an empty area, and select Open in Terminal or open PowerShell directly in that folder.
The automatic installer of the current version can detect the executable's architecture and the graphics API used, and install the necessary chain components.
Run:
powershell.exe -ExecutionPolicy Bypass -File .\Install-DLSS5Feeder.ps1 -PrereleaseAfter starting the installer, confirm the executable identified by the program.
When the installer asks which neural consumer should be used, select:
Deep Fried Chicken (DFC)
The installer automatically handles several necessary components, including ReShade with add-on support, the DLSS5-Feeder itself, the ReShade framework, and LumeniteFX. Deep Fried Chicken remains the exception: since its files are not published by the author as a public download, the installer prompts for them to be provided manually.
How to place the Deep Fried Chicken files in the installation
After downloading the Deep Fried Chicken package, place the three files below in the same folder as the executable of the 64-bit game or emulator:
deep-fried-chicken.addon64
deep-fried-chicken-nvngx.dll
deep-fried-chicken.cfg
In 32-bit games, DLSS5-Feeder itself uses a different structure, featuring the 32-bit component and the 64-bit helper process.
Important: do not leave another neural consumer, such as a RenoDX DLSS 5 installation, loaded simultaneously. The project warns that only one neural consumer should be active per session.
What happens to the NVIDIA files?
In addition to the Deep Fried Chicken files, the method also uses the runtimes nvngx_dlssnr.dll and nvngx_dlss.dll. They are part of the chain used by Neural Rendering and need to be available for processing to work.
DLSS5-Feeder does not include these files in its main package. Therefore, the installation may request that they be provided according to the project's instructions.
How to activate neural processing
After the installation finishes, open the game normally and press Home to open the ReShade dashboard.
In the ReShade configuration, the project uses the LumeniteFX as a motion vector provider. In the recommended default configuration, the value used is:
DLSS5_MV_PROVIDER = 3
Next, enable LUMENITE: Kernel 2.0 and the DLSS 5 Feed. Then, open the Deep Fried Chicken interface and enable neural processing.
The project also recommends disabling MSAA and SSAA in the game itself during testing.
How to check if DLSS5-Feeder is working
When the Feeder is working correctly, the file dlss5-feed.log will be created in the executable's folder.
Among the information that may appear in the log are messages indicating that the DLAA feature has been created, that frames are being delivered, and that the selected motion vector provider is LumeniteFX.
The ReShade panel itself also displays information about the Feeder status and neural processing.
How to configure Deep Fried Chicken passes
With Deep Fried Chicken running, open its interface inside ReShade and locate the option Neural Passes.
This setting determines how many times Neural Rendering will be executed on each frame.
With 1 pass, processing is performed once. With 2 passes, the same process is executed twice consecutively. The number can be increased progressively to test higher values.
Deep Fried Chicken allows you to reach quite high quantities of passes, but the program itself classifies very high values as an extreme stress mode.
Do more passes mean a better image?
Not necessarily. Each new pass alters the result produced by the previous one again, and the behavior can vary quite a bit depending on the image.
In certain scenes, a few passes can increase definition or modify the appearance of textures and outlines. As the number increases, however, the processing may start to exaggerate image features and produce less natural results or even distortions.
Therefore, increasing the number of passes does not simply mean improving quality. The purpose of the test is precisely to observe how far the result remains interesting before artifacts and performance loss begin to dominate the image.
How to test 1, 2, 3, 5, 7, or 10 passes
To make an organized comparison, start with a single pass and increase the value gradually.
An interesting sequence for testing is 1, 2, 3, 5, 7, and 10 passes. At each step, try to keep the exact same scene and framing.
This makes it easier to observe what actually changed in the image with each increase in neural processing.
How to monitor FPS, temperature, and power consumption
As each additional pass increases the processing load, it is worth monitoring the graphics card's behavior during testing.
Programs like MSI Afterburner, RivaTuner Statistics Server and HWiNFO allow you to track information such as FPS, frametime, GPU utilization, temperature and power consumption.
This helps compare not only the image, but also the performance cost of each pass.
A GPU operating close to 100% usage during this type of test does not automatically mean that a problem exists. It is important to observe mainly temperature, stability, and possible frequency reduction due to temperature or power limit.
How to properly test different passes
For the comparison to be valid, keep as many conditions as possible the same between tests.
Use the same scene, the same time of day, the same camera, the same character position, and the same graphics settingsChanges in lighting or the movement of scene elements can make it look like Neural Rendering has changed the image when, in fact, the game itself has changed the presented situation.
It is also worth noting FPS, frametime, temperature, GPU utilization, and power consumption at each pass count.
Which NVIDIA driver to use?
The behavior of Neural Rendering depends not only on the DLSS5-Feeder and Deep Fried Chicken, but also on the combination of the NVIDIA driver and the NGX runtimes used by the installation.
Therefore, we do not recommend assuming automatically that every newer driver will be incompatible or that the 616.56 will be mandatory on all computers. The project itself maintains compatibility tests per driver and neural consumer combination.
The most recommended procedure is to first test the installation with the driver you already use. If the neural processing is not created correctly, the project itself recommends using the Feeder test tool to check the installed combination.
In current versions of the project, the test can be executed with:
.\host64\host64.exe --testThe exact name of the auxiliary executable may vary depending on the installation structure. Check the folder created by the Feeder in case this file is located elsewhere.
In the project documentation, specific driver and consumer combinations may exhibit different behaviors. For this reason, the NVIDIA 616.56 should be treated as a compatibility alternative for cases where the current configuration fails to initialize neural processing correctly.
Download the NVIDIA 616.56 driver
If your current driver and Neural Rendering combination experiences issues and you need to test a known driver version, the NVIDIA 616.56 can be used as an alternative.
The file below is the official NVIDIA package for GeForce Desktop cards on 64-bit Windows 10 and Windows 11.
Important: this package is intended for GeForce desktopcards. Laptop users should use the driver corresponding to the manufacturer and model of the equipment.
If it is necessary to downgrade, run the installer normally and confirm the driver replacement. After installation, check the NVIDIA control panel or Device Manager to ensure the correct version was installed.
How to remove DLSS5-Feeder
Since the Feeder installs several components in the game folder, removal must be done carefully to avoid deleting the title's original files.
The automatic installer keeps information and backups used during installation. Before manually removing any DLL or add-on, check which files were added by the method and which already originally belonged to the game.
In installations performed over a previous version, it is also important to remove or restore any components from other neural consumers to avoid conflicts.
Precautions with games that use anti-cheat
Mods and add-ons that alter the rendering process can conflict with anti-cheat systems. Therefore, avoid using this type of modification in competitive games or titles that have active protection mechanisms.
The fact that the method technically works in a given game does not mean it is appropriate for use in online matches.
Is it worth using multiple passes of DLSS 5?
The combination DLSS5-Feeder + Deep Fried Chicken is interesting primarily as an experimentation tool, because it allows bringing Neural Rendering to games and emulators that normally do not offer this feature.
Rather than simply maxing out the number of passes, the interesting part is comparing different values and observing how the image changes and how much performance is lost at each step.
One or a few passes can produce interesting changes in certain scenes. As the number increases, however, increasingly artificial results may appear, while the computational cost grows rapidly.
To keep up with updates, compatibility changes, and new versions of the method, check the official DLSS5-Feeder repository on GitHub and the official channel of Deep Fried Chicken on Discord.
Pingback: DLSS 5 no Witcher 3 custa até 30% de desempenho
Pingback: DLSS 5 Swapper 2.2.9 atualiza Feeder e OptiScaler